| 3d-files | ||
| pictures | ||
| arduino.ino | ||
| README.md | ||
K-Pop Lightstick
This Repo features the software of an Arduino Lightstick as well as the 3D Files for a custom NCT DREAM Lightstick
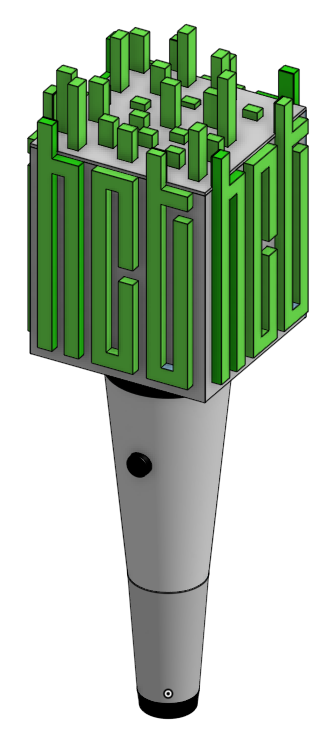
3D-Print
The Lightstick was printed in 3 different colors.
The Block Top.stl file can be modified to not come with holes for the Neo_City.stl cubes rising out of the top to match the official lightstick more accurately.
Be aware, that this 3D Build is slightly larger than the Official NCT DREAM Lightstick and you may not be allowed into concerts with it. I had no issues at the NCT DREAM Tour 2024 in Rotterdam but the security checks at the entrance were cursory, lacking the thoroughness you would usually have at different concerts.
WHITE:
Block Base.stlBlock Side.stlBlock Top.stlHandle Base Bottom.stlHandle Base.stl
BLACK:
Handle Ring BottomHandle Ring TopPower Button
TRANSPARENT NEON GREEN:
Neo_City.stlshiny_c_thicker.stlshiny_c.stlshiny_n_thicker.stlshiny_n.stlshiny_t_thicker.stlshiny_t.stl
Since I had issues with the prints of the letters, I made a thicker version of each letter to ensure that there would be no holes.
Assembly
The Assembly of the Prints is pretty self-explanatory. Take a look at the pictures in the /picture folder of the repo.
I chose to not glue the Block Base.stl and the Handle Base.stl pieces together to be able to troubleshoot/replace the electronics inside at any time.
Electronics
The arduino.ino file contains the Arduino code I used for the lightstick.
An Arduino Nano was used with the following Pin-Out:
const int buttonPin = 2; // Pin for the button
const int redPin = 11; // Pin for the red channel of RGB LED
const int greenPin = 10; // Pin for the green channel of RGB LED
const int bluePin = 9; // Pin for the blue channel of RGB LED
const int motorPin = 8; // Pin to control the motor
Note: These are the Digital Pins on the Arduino Nano
Features of the Program
- The
buttonPinis for the Power Button on theHandle Base.stland is used for controlling the Light. - The
redPin,greenPinandbluePinare used for controlling the LED. IMPORTANT: These are ANODE RGB LEDs. If You plan on using Kathode LEDs, simply remove255 -from thesetRGBfunction at the bottom of the Program, to invert the values. (This is only a fix based on logic, I have no LEDs to test it) - The
motorPinis used for controlling a simple Vibration Motor that runs for 1 second when turning on the Lightstick. This is inspired from the VIXX Official Lightstick that has similar behaviour. It is completely irrelevant to the general functionality of the Lightstick which is, well, to have Light.
Instructions
- Connect a Power button to the Arduino
buttonPinand groud - Connect the Vibration Motor (A simple motor with some weight glued of axis to make it vibrate when rotating) to the
motorPinand ground - Connect the RGB LEDs to the 3 color pins and 3.3V
- Glue together 3 AAA Batteries, solder them together and connect them to the Voltage In` and ground
- Flash the Arduino Nano with the program and you're done.
- Insert the electronics into the Arduino and close it up.
Usage
Hold the Power Button for approx. 1 second and release it. The Lightstick should vibrate for a second and then the lights turn on, defaulting to a neon green.
Press the button to cycle between colors and hold it for a second to turn it off again.